History (1992 - 2009)
was the Panasonic F10/150 Camera, which they both owned. These cameras were special in those days because they would offer you a variety of configurations.
April 1992
Scarborough Video Services started in 1992, but the idea was born one year earlier in 1991, where two guys with the same interests meet. There common denominator
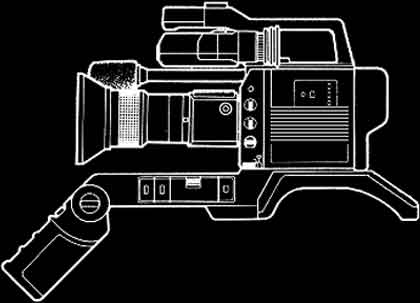
- Zoom Lens
- 8 x Power
- 12 x Power
- 12 x Studio
- Viewfinders
- 1 inch
- 5 inch
- Power Adaptors
- Gen-Lock (12 volts)
- R/Cl Unit (12 volts)
- AC (240 volts)
- Shoulder Grip
F10 camera Gen-locks (WV-AD36E) and they could be adjusted to lock the cameras together. Another Panasonic F10/150 camera was bought to make up the numbers to three. A talk back system was required so the Director could talk to his crew, this was also built from scratch. The cables used to feed the cameras were at first all separate and took ages to rig. Later they
technical hiccups and was recorded on VHS tape.
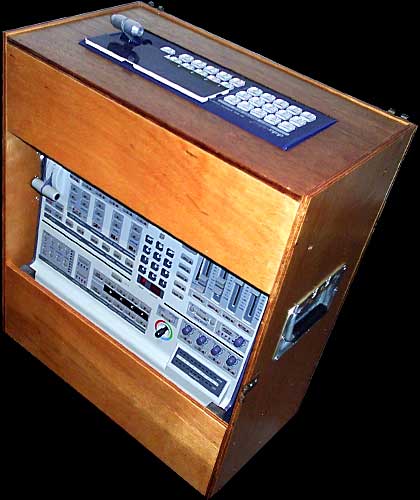
It was decided after this first event, that a Vision mixer would have to be purchased or built, if we wanted to continue. I started to build a mixer from spare parts, it would be able to control four cameras with dissolves but no cuts. The Sync would be controlled by the Panasonic
The first venue was at St Mary's Church in Scarborough, where we were asked if we could record and relay a pop concert. We got together and formed a crew, hired a vision mixer (which did not require the cameras to be synchronized), another camera and lots of BNC cable, plus a large screen and monitors. The show went extremely well with no
were made up into looms containing.
- Video
- Sync
- Power
- Tally and Talkback
These cables came back to the Vision mixer, then feed onto a bank of three B&W monitors one for each camera and there terminated. To improve the picture quality a Sony U-Matic recorder (VO2630) was purchased. The only problem with this was the show lengths and meant swift tape changes, a tricky job as the tapes only lasted for one hour. The sound side was covered by a second hand Allen & Heath Sound mixer with two Peavey Microphones. Shows that we
recorded in the earlier years
titles were printed in black on continuous paper and placed on a cylinder with a motor attached on one end and the speed controlled. This was then recorded onto U-Matic tape. This method was used for many years.
record and put on pause, the title tape was then played and by following the cue sheet, the pause released, this was repeated for each stage of the process, normally seven times.
The titles were created using a Mono Camera (B&W) linked to a superimpose unit, the
were not edited, because of the deterioration that would occur from making a second U-Matic copy. The Duplication Process was very time consuming. A U-Matic recorder was connected to a Kramer (VM-6A) Video-Audio Distributor, and then to four Canon (VR-30) Video recorders. All were set to
September 1995
It was time to change and update the way the titles were being created and a suitable program on the market at the time, was a DOS based program from Maze Technology, called PC-Titler Professional v3.34. This program was used for six and half years before we needed to change it.
June 1993
Two Sony U-Matic (VO5630) recorders were purchased and this meant we could overlap the recordings, this made life that much easier for changing the tapes.
August 1992
A second hand Sony (370P) Special Effects Generator along with another B&W monitor and Panasonic F10/100 camera were purchased and the system
re-housed to make transport and rigging that much easier.
June 1996
The Sony (370P) Special Effects Generator gave up the ghost during a show, luckily we were able to record the following night with a mixer we had bought some months
before as a replacement, JVC (KM-1200) SEG. We also replaced the Canon (VR-30) video recorders with five Sony (SLV-E210) video recorders. They could all be operated by one remote.
March 1997
Jobs in Scarborough Video Services were rearranged to try and ease the work load. The Co-ordinators job, Accounts, Duplication and Distribution were all farmed out to other Partners. A special thanks has to go to these guys, with Hume the continuation of Scarborough Video Services would never have happened.
November 1999
Was our next big break, purchasing a ready built editing system from Jacom in Louth. It had a Pinnacle DC30 capture card with Windows 98 platform and Adobe (Premiere 5.1c) software, because of the limitations of file size we used a small program called AVI-IO and this enabled us to capture three hours or more onto hard disk. We recorded events directly to the computer which eliminated any deterioration of the final product, and making editing a pleasure. The Duplication Process was also made easier with this purchase. Start the recorders and play the timeline on the Computer, what could be simpler.
March 2001
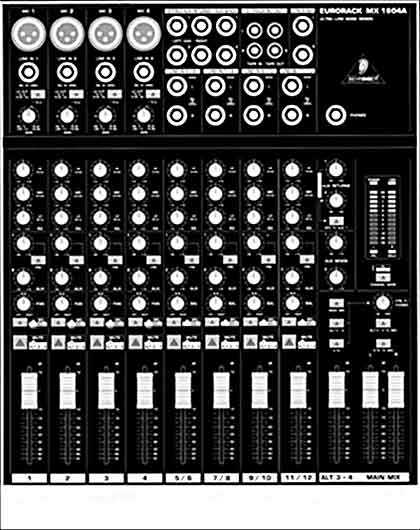
The sound side had at this point been neglected for sometime and with the help from Stephen Blenkinsopp our sound advicer from Waveform, we redress the problem by upgrading the sound with a Behringer Eurorack (MX1604A) sound mixer, Behringer Composer Pro (MDX2200) compressor and 2 x Opus 83 Condenser Microphones. Plus a Kramer Video Audio Distribution (VM-5ARN) Amplifier, all rack mounted.
October 2002
A set of seven new VHS recorders were bought, because the Sony SLV-E210 mono machines were becoming to long in the tooth, so we decided to replace them with the Sony SLE SE-720G Stereo recorders. The mono tapes were dropped from our sales and the pricing structure adjusted accordingly.
March 2002
With the creation of these new PC's, it made Titling and Editing that much more creative and of course better quality. Events were captured on a rack mounted 80GB Hard Disk Drive, which could then be taken to the Titling & Editing House, and finally to the Duplication House.
September 2002
One of the PC's was software upgraded to Adobe Premiere v6.5. The new version has a much better titling package (Title Designer) and so all of the titles are now Exported as an AVI file, making it compatible with version 6.0.
January 2002
A brave decision was made to build three Computer systems (PC's) from scratch. To be located in three different locations.
- Capture Computer (Control Room).
- Editing & Titling Computer (Editing House).
- Duplication Computer (Duplication House).
With the help from magazines like Computer Video, friends John Norton and Russell Hawley (DPS integro Ltd), made the building of these systems that much easier. You do need patience
thou, but in the end it was all worth it.
June 2003
One of the many events that we cover each year, was going to change their format, they would be using two stages set apart and both stages would require to be covered, so we needed to using four microphones. Another pair of AKG (C1000S) condenser microphones were purchased and put into use straight away.
November 2003
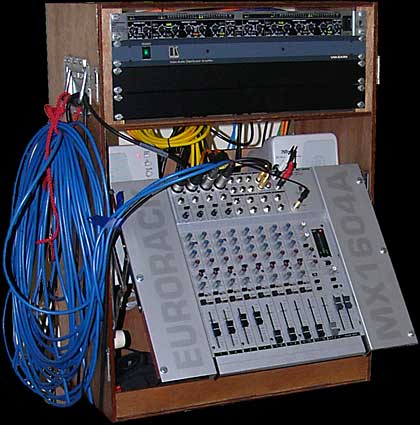
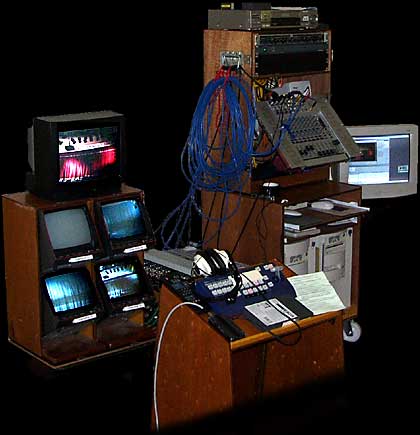
The Sound and Computer gear was becoming unmanageable, taking ages to rig and causing unnecessary ware and tear on the equipment.
This was evident every time we moved to a new location. So the units were rearranged into two special housings.
Computer flight case
- DV500 Capture Computer
- DC30 Backup Computer
- Breakout Boxes
- Keyboards & Mouse
- Two-way Switcher (Monitor)
- Wiring to all other External Units
Sound flight case
- Composer pro (MDX2200)
- Kramer Video Audio Distribution (VM-5ARN) Amplifier
- Behringer Eurorack (MX1604A) Sound Mixer
- Speakers & Cans
- Wiring to all other External Units
Matrox G550 Dual Head with two monitors attached for Editing and when ever the program was sat on the right hand screen the output monitor went blank, if you moved the program back to the left screen it reappear. Since then we have had no major problem in using it and always look forward to the final product.
came up to the standard of reliability and that was Ulead DVD MovieFactory 2. We purchased it straight away and got the latest version (MovieFactory 3). From the outset we had problems, the usual driver updates, but still it would not work, we were ready to find the nearest skip and then we found the problem. If you can remember, we are using a
February 2004
This is where we introduced DVD Authoring to Scarborough Video Services. We purchase one DVD Pioneer (DVR-106DA) R/RW. Tried out some software and experimented with it. In the end thou it was all down to the advice from Alan Grove at
The Video Warehouse. He said he had tried out various software packages and in the end, there was only one that
May 2004
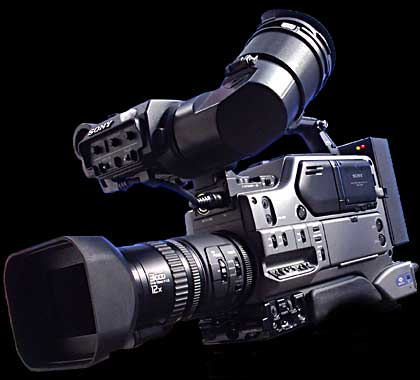
The decision to replace the Panasonic F10/200 cameras had always been a difficult choice, because of the price and quality. The other difficulty we had was the exciting Vision mixer, which would only work with cameras that were Gen-locked together, the new cameras did not have this facility on board. So we would either have to purchase time base corrector for each camera, or replace the Vision mixer with in-built correction. To this end a new Datavideo (SE-800) Digital Video Mixer was purchased, along with a new Sony Digital Camcorder (DSR-250P). The output from this new camera is phenomenal and waiting to replace the other three cameras is going to be agony. But by not charging for recording and keeping the tape and DVD prices down, means funds will not stretch that far as yet, but that day will arrive.
special note here thou, if you do purchase this remote, the pin outs in the manual are printed wrong. They should be as follows.
June 2004
So we have the new vision mixer installed, all working fine. Except for one major problem, no Tally light system. It meant another purchase, a Datavideo (RMC-90) remote control panel for SE-800. This
| Video Channel | Red LED | Green LED | Yellow LED |
| On Air | Off Line | Stand By | |
| A | Pin 1 | Pin 2 | Pin 3 |
| B | Pin 6 | Pin 7 | Pin 8 |
| C | Pin 11 | Pin 12 | Pin 13 |
| D | Pin 5 | Pin 10 | Pin 15 |
device connects to the Vision mixer and has the outputs for tally lights (Standby and On). We wired the outputs to our Multi-distribution unit where the relays are that feed the cameras and monitors. One
April 2005
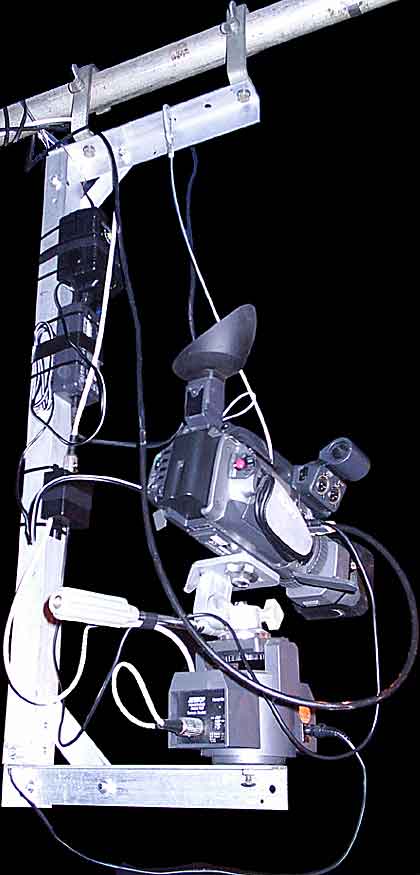
With the aim of trying to find that unusual angle to add to our range of shots and because of sometimes there being no place to position that camera and operator, we needed to introduce a remote camera, which could be hung off any lighting bar (scaffolding). The control of which would be done via a cable run back to the control room and at this point it was just a pan and tilt operation but very useful all the same.
May 2005
A year later, since purchasing the last new camera. The quality of the images and ease of use has proved it's worth and now the time was looking right, to replace another two.
One of the cameras like before, a Sony Digital Camcorder (DSR-250P) but this time it was going to be tripod mounted. So a new tripod was neccasary to support the new load. A Manfrotto lightweight tripod (525MV) with spreader and bowl for (503) pan and tilt head.
To complete this package a SignVideo Zoom Commander was purchased. This is positioned on the pan bar and controls the zoom. It uses the LANC (Local Application Control Bus System) socket, to connect it to the camera.
The other camera which was to be mounted on the remote rig, was a Sony Digital Camcorder (DSR-150P). This also used a SignVideo Zoom Commander but this time both zoom and focus was to be used. Wired back to the control room with the pan and tilt controls.
August 2005
Our home and base for many years now has been the YMCA Theatre in Scarborough. Most of the productions we record being performed here, it was the perfect place to set and rig a contol room. The multicores run back to the control room down either side of the theatre and took some time to rig. So we have now hard wired three camera positions with breakout boxes, feed back to our control room.
September 2005
A final push was made to bring together our new purchases from last year, which were used in the control room. The Datavideo (SE-800) digital video mixer, Datavideo (RMC-90) remote control panel for SE-800 and our Multi-distribution box with video, power, tally, and talkback. These were all placed together in a single flight case and wired together to make rigging much easier and quicker.
October 2005
We asked our members whether they would be interested in loaning a sum of money, so we could purchase the last camera. They all agreed and as before, a Sony Digital Camcorder (DSR-250P) with Manfrotto lightweight tripod (525MV) with spreader and bowl for (503) pan and tilt head. Plus the SignVideo Zoom Commander for control of the zoom from the pan bar.
Canopus. The show are produced in AVI file format and are edited using Adobe Premiere v6.5, the software attachment ProCoder Express compresses the timeline in Premiere into an M2P file format, this is then imported into MovieFactory 3, which means it doesn't require to be compress again. Since we have used this set-up, we have had very few problems.
September 2005
Although we have been mainly satisfied with out compression software (MovieFactory 3) there has been occasion when it has thrown it's dummy out and refused to compress and crashed. After much perseverance, we were able to complete the jobs. So it was decided to invest in a new software package ProCoder Express from
March 2007
The placing of cameras at the YMCA Theatre has always been difficult, so with the kind permission of the YMCA they gave us the go ahead to build a platform on the right-hand side of the theatre, above the exit. Built using wood, plasterboard and painted and carpeted in the same colours as the surrounding theatre. We hope to match this platform with one on the other side sometime soon.

and provided a perfect pickup position.
We needed to purchase a small sound mixer (Behringer XENYX802) to add to our exciting mixer, so we could use all four mikes (two on stage and two on the audience). The new mixer would then be used in taking a live link from the YMCA's sound mixer. This new mixer would then be wired back into our exciting mixer on a line input.
May 2008
The Talkback system is now over 16 years old and although they have served us well, they have been requiring a lot of maintenance to keep them going, it was time to replace them with a better system. The system we went for was the ASL Intercom One Channel Beltpack (BS 15) with One Channel Powersupply (BS 181). They have a volume (listen level) control, a Talk and Call button with LED indicators. A momentary push makes the red LED flash, whilst holding the button for two seconds will activate the CALL sound signal.
February 2007
Recording the sounds that are produced on stage at the YMCA theatre when they do not have enough mikes available always created a problem for us. The mikes that we had were positioned too far away, good for audiences thou. The answer was to install two extra mikes that could be lowered when we were recording. We set-up a pulley system through the loft space which ran back to our control room. They were position just above the apron at the top of the proscenium
March 2008
Another flight case was needed to house our latest requisition, two Sony LCD Digital Colour Monitors
(KDL-26S20). These replace our four Black and White monitors. One for the Program Output and the other for the four camera outputs. This is achieved with another new item, a Datavideo Quad Preview Box (RMC-140). You can select 4 different display modes, Quad, POP, PIP, or full screen, plus tally light indicators (On Line, Stand by) on the same monitor. In the same flight case we have placed the power supplies (Cameras, Vision Mixer, Quad, Talkback, UPS).
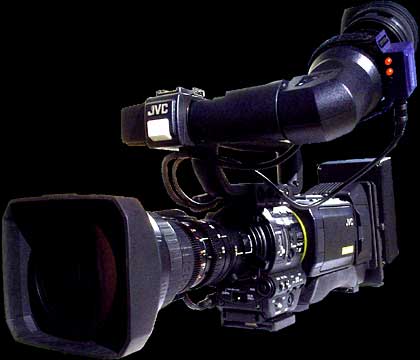
JVC GY-HD200E body with FUJINON TV lens TH16 x 5.5BRMU seamed to fit our specifications nicely. Lighter than the Sony and could operate with our exciting set-up until the day we would go to full conversion (HD). Two were purchased straight away with 1 x Zoom controller.
August 2008
We had always wanted to record in Widescreen (16 x 9) format but the Sony DSR-250P cameras although capable of switching, did not have the quality that we demanded. So once again we were on the search for a reasonably priced camera. This time they would also need to be able to record in High Definition (HD). The
September 2008
Having purchased the new cameras presented us with a new challenge, how to keep them powered up. These cameras demanded a greater consumption and needed a new power supply straight away. The unit was made with three supplies, each supplying two cameras.
Another JVC GY-HD200E with FUJINON TV lens TH16 x 5.5BRMU was purchased by one of our partners, he wanted it for his own use, but we would have access to it on all of our productions. This would be purchased from him at a later day, when funds aloud.
Iris, etc). A focus controller by VariZoom (VZ-EFC}. A zoom controller, which would be fully variable. Last of all a professional Remote Control Pan & Tilt Head, again fully variable. The kit was then built into a box, which could then be mounted onto a tripod to make it easier for operation.
May 2009
It was time to complete the set of cameras and purchase another JVC GY-HD201E with FUJINON TV lens TH16 x 5.5BRMU, this time it would replace our remote camera. So to accomplish this, various bits of kit would need to be purchased. Camera controller (JVC RM-LP55) which would control the settings on the camera (White balance, Gain,